The following instructions show the fitting of the 2 Piece 1/2" Weldless Tap Kit but the instructions apply equally to fitting the 3 Piece 1/2" Weldless Tap Kit.
This weldless tap kit includes a large washer that fully encapsulates the high temperature o-ring. This makes it easy to fit with a reliable leak free fitting and provides a very solid tap fitting as it is all tightened to metal on metal.
In some other fittings without this, the sealing o-ring or gasket washer becomes a flexible joint in the tap fitting, leading to movement for example when operating the tap, and potentially leaks.
You will need :-
| 1. Make Hole in Pot |
 |
Use masking tape to mark out where the 21mm hole for the tap will be made.
We position the hole so it is just high enough so that a 90 degree pipe elbow can be screwed onto the inside of the pot after the tap has been fitted and use a 21mm hole punch that leaves a very cleanly cut hole.
Please be careful when installing your tap kit for sharp edges either in your own cut hole, or also on any of the tap fittings.
|
|
| |
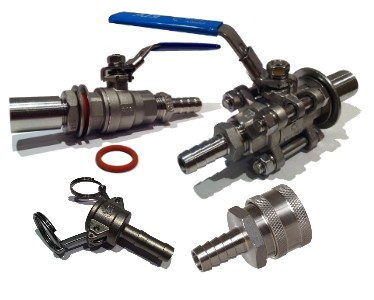
| 2. Weldless Tap Kit Parts |
 |
Tap kit parts laid out ready for fitting.
|
|
| |
| 3. Apply PTFE to the Nipple |
 |
Take the ½” parallel nipple and wrap around PTFE tape 4 or 5 times so it covers just over about half the length of the fitting.
This is essential for the nipple threads to be sealed inside the ball valve.
|
|
| |
| 4. Attach Nipple To Tap |
 |
Screw the parallel nipple into the side of the tap that will fit against the pot.
Turn the ball valve to the ‘on’ position and it will clearer which side to fit the nipple, i.e. the side opposite the handle.
|
|
| |
| 5. Add External Washers and O-Ring |
 |
Add one of the smaller washers, then an o-ring, and then the large washer over the nipple.
|
|
| |
| 6. Push Washers and O-Ring Up To Tap |
 |
Position the large washer so it sits outside the o-ring.
|
|
| |
| 7. Add Tap To Stockpot |
 |
Offer the tap up to the vessel passing the threaded nipple through the hole made in the pot.
You will need to move the washers into position to try and centre the smaller washer, and to ensure the larger washer is fitting around the outside of the o-ring.
The fully encapsulated o-ring is very effective and avoids issues of the o-ring becoming misshapen, and possibly squeezed outside of the washer as the fitting is tightened.
|
|
| |
| 8. Add Washer and Nut Inside Pot |
 |
Add the washer over the nipple inside the pot, and then screw on the hex lock nut.
Holding the tap against the outside of the stockpot with the washers moved into correct position, hand tighten the locknut inside the pot.
|
|
| |
| 9. Tighten Nut Inside Of Pot |
 |
Ensure the tap is correctly orientated on the outside of the stockpot and tighten the lock nut snugly (but don’t overdo it),
|
|
| |
| 10. Test |
 |
Fill stockpot with water above the level of the tap fitting and test for leaks.
|
|
| |
| 11. Fitting Complete |
 |
Final fitting should look as follows – no leaks and solidly fitted to the pot.
|
|
Disclaimer: While the content aim to be clear and complete, any damage occurring through customers using these instructions are the responsibility of the customer